Friday, June 26, 2015

GISProgramming: Module 6 - Geoprocessing with Python

     Just as in last week's assignment, geoprocessing is covered albeit with a greater emphasis on using Python. The assignment this week focused on writing a script that performs three geoprocessing tasks: adding coordinates to a layer (AddXY tool), creating a buffer around features (Buffer tool), and dissolving the buffered areas into a single feature (Dissolve tool). The resulting program must also print messages for each task to show that it was carried out successfully in addition to working within a set workspace. Each of these tools and tasks reinforced how to use Python for automating geoprocessing. 
     Writing the code for each tool provided practice not only calling the tools but using the proper syntax for each tool. There are several ways to get help with syntax and they are all convenient and easy to access. If writing code within ArcGIS there are code autocompletion prompts and syntax help in the Python window. ArcGIS Help is also useful in that it provides example code for each tool. It can be accessed using the Search tool (or through your browser of choice). Setting the environment and workspace is an example of using classes in ArcPy.   

A screenshot displaying the results of a program that runs several geoprocessing
 tasks and prints messages to show the tool was successfully run.
     Throughout my code I wrote comments to delineate each line or section's purpose. This helped me keep track of what I had accomplished while writing the code. Once I had finished the code, I found the comments useful "bookmarks" for finding my place in the code. 

Friday, June 19, 2015

GISProgramming: Module 5 - Geoprocessing in ArcGIS

     This week I added some new tools to my GIS toolbox -- batch processing (a huge time saver) and geoprocessing with Python script (by way of ModelBuilder). Geoprocessing in ArcGIS is carried out through toolsets found in ArcToolbox, models made in ModelBuilder, or Python scripts. In the Intro to GIS course, I learned how to use many of these tools and I even took a virtual course that introduced ModelBuilder and its capabilities. This semester rounds out the geoprocessing tool kit by introducing geoprocessing using Python. Now, not only can I make a model in ModelBuilder but I can take that model and export it into Python script to make an even more robust geoprocessing environment -- one that is custom made to suit my geoprocessing needs.

ModelBuilder
     ModelBuilder is a visual programming language and this makes programming intuitive and appealing. The ability to drag and drop shapefiles and tools into the interactive window allows the programmer to easily follow the logic of their model. Both shapes and color increase user friendliness and add an additional level of design appeal. That is, as you manipulate the parameters (symbolized by ovals for input/output and rectangles for tools) of the model, the become colored to indicate their state (color being ready to run and hollow demonstrating insufficient input). When the model is run, the tools and outputs display a drop shadow indicating their successful implementation.

Geoprocessing Scripts
     Python scripting, unlike ModelBuilder, is text-based. One of the great features of models made with ModelBuilder is that they can be exported to Python script. With some tinkering (the resulting script is a skeleton and requires additional information, such as full file paths), the script becomes a more robust version of the model (because it does not require ArcMap to be open in order to run). This script can me made into a script tool by importing it into your custom tool box. It is also possible to share these custom tools by way of zip files.

Geoprocessing in ArcGIS
     Below is a screenshot of the output shapefile produced using the geoprocessing methods discussed above. The assignment asked us to make a model that removes soils that are poorly suited to farming from a given geographic extent, in this case a basin. The model (and script) I programmed takes a shapefile of soil types and clips (using the Clip tool) it to the extent of a basin. A selection (Select tool) is made (SQL statement written) to chose soils from this new output that are classified as "not prime farmland." The selected soils are then removed from the basin (Erase tool) with the final output being a shapefile displaying only a subset of the soils from the original shapefile remaining.  

A screenshot of the result of geoprocessing in ArcGIS using a model written in
ModelBuilder (with an accompanying Python script that produces the same result). 


Friday, June 12, 2015

GISProgramming: Participation Assignment 1 -- GIS In the News

      I have mentioned before that our courses provide us the opportunity to engage in discussion (and help one another with assignments) with fellow classmates through a discussion board. This is an important resource as this is an online certification program and we do not get to interact in person (though we do have a nifty program that lets us video chat with each other). This participation assignment had us seeking out instances of GIS in the news by way of scientific journals, blogs, or news outlets. I have increasingly noticed news outlets, like NPR, NYTimes, Huffington Post, use maps or refer to maps in their reporting. Often, these maps are compiled using GIS software and possibly even using Python to speed along their analyses.
     To complete this assignment I looked up recent scientific articles that used GIS in an anthropological framework. As an anthropologist, I wanted to see how GIS is being used in this discipline. Additionally, I chose to examine the application of GIS in an archaeological setting as I am currently pursuing a career in archaeology.
     The particular article I chose recognized the utility of spatial analysis within a GIS and its powerful capacity for discerning archaeological patterns. This study uses GIS to analyze the spatial distribution of remains (human/faunal), artifacts, and the presence of ochre in a cave used by Paleolithic peoples in present day Cantabria, Spain. A combination of QGIS and ArcGIS 10 were used to georeference excavation photos, create a 3-D polygon surface of ochre distribution (by way of the Triangulated Irregular Network tool), and reconstruct human body positions with XY-coordinates and vector data.
     The article includes figures that highlight the results of the various spatial analyses performed. These analyses helped characterize the site and preparation of the area for internment. Taphonomic analyses in conjunction with spatial analyses of the burial at this site resulted in its classification as a disturbed primary burial. The authors of this study propose using spatial analyses as an analytical means for studying Paleolithic burial activities. This multidisciplinary approach, merging geographic science and an anthropological/archaeological framework, is exactly what I want to adopt in future endeavors. 

     As an aside, I recently attended a workshop on non-destructive survey methods in archaeology (through the National Parks Service). The workshop exposed me to ground penetrating radar, magnetometry, and other geophysical survey techniques and how these can be integrated within a GIS to understand a site. It blew me away. I cannot wait to apply all of the skills I am learning through this certificate, especially Python, in a career in archaeology/anthropology. 


Citation
Geiling, J.M., MarĂ­n-Arroyo, A.B., Spatial distribution analysis of the Lower Magdalenian human burial in El Miron Cave (Cantabria, Spain), Journal of Archaeological Science (2015), http://dx.doi.org/10.1016/j.jas.2015.03.005

GISProgramming: Module 4 - Debugging and Error Handling

     Debugging! This week was all about identifying and fixing errors in code. Some errors are simple to spot and easily fixed, such as incorrect spelling or spelling inconsistencies, case sensitivity, and incorrect indentation, to name a few. Other errors are not easy to see immediately, such as exceptions. These require the program to run to encounter the exception. The handy thing about Python is that it will provide information about the type of error and its location. For instance, exceptions will display in the interactive window stating the line in which the exception was raised.
     We were given several scripts to comb through to practice finding common errors, syntax errors, and exceptions. We also gave running a program in PythonWin debugger a try. I will go through each script and describe some of the errors I found and corrected. No logic errors were addressed in these exercises, only syntax errors and exceptions.  

Script 1
    The first script had two errors. The first error was a simple capitalization mistake and easily fixed. The second error was an exception that I did not catch until I tried to run the program. The exception raised was an "AttributeError." This type of exception is raised when an attribute reference or assignment fails.  I corrected this exception by correcting a spelling mistake. So, I didn't necessarily have to run the program to find this error but it helped me locate the line(s) that contained the error. This was handy because I didn't have to go through line by line and proof read. It, however, would have saved me some time if I had just noticed the spelling mistake in the first place. The screenshot of the interactive window below shows the results of the debugged program. This program gets and prints the names of the fields found in a particular shapefile.

Script 1 
A screenshot of the debugged and error corrected program
that results in a list of field names for a given shapefile.
Script 2
     The second script contained eight errors. As I encountered the errors it helped to write a comment on the side of the line in which I fixed the error. # That way I could keep track of the changes I was making to the script. Some of the errors I encountered were incorrect file paths, spelling mistakes, and a few exceptions (a TypeError and an AttributeError, for example). Once the program was debugged, when run it acquires and prints the names of the layers found in a data frame.   
Script 2
A screenshot of the successfully debugged program that results
in a list of the layers found in the data frame(s) of a given .mxd file.
Script 3
     The final script when run raised an exception. The goal for this script was to get the program to run despite the exception. I added a try-except statement to allow this program to run while printing the type of exception raised. The try-except statement is a handy tool for debugging. At first, I generated a lot of work for myself because I tried to fix the exception raised with a try-except statement but then encountered a different exception when I ran this "corrected" version of the program. I made another try-except statement for this new exception and again encountered another. I could not get this program to run. Then it hit me. I only had to use one try-except statement and then have the program print the exception raised. The program ran successfully after that. Phew. The results are displayed below. When this program runs, an exception is printed and the name, spatial reference, and scale of a given data frame is shown. 
Script 3
A screenshot of the final script in the exercise.
It shows the result of adding a try-except statement to catch
an exception and still run the remaining script in the program. 
     Are you still with me? At first I felt like learning debugging this early in the course was like being thrown into the deep end of the Python pool. This will pay off in the weeks to come, I am sure. I am still a little befuddled by the debugger but that is probably due to lack of exposure. I'd like to think that I will be a careful programmer but no one is perfect and debugging is essential to programming success. Now, if an exception is raised in my future programs I won't panic. Thanks debugging.


[Hopefully my brain won't fall out raising a MemoryError.] 

Friday, June 5, 2015

GIS Programming: Module 3 - Python Fundamentals Part II

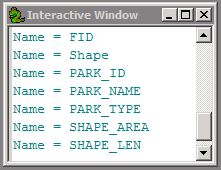
     This week's module continues examining Python fundamentals. Lists, methods, modules, and conditional statements were combined to produce a program with several outputs. This first portion of code was provided but there were two syntax errors that had to be corrected for it to run properly. The next portion of code had to be written from scratch. It needed to produce a
list of 20 randomly selected numbers between 0 and 10. To accomplish this I used a while loop to
populate an empty list with 20 numbers (generated using the random module). The final portion of code had to eliminate a number from that list. I chose the number 8 and used both if/elif and while
loops to remove that number from the list and print a new list devoid of instances of 8.
     What I found most helpful this week was writing out a verbal translation of the aim of each line of code (a method discussed on the class board). In addition, I would write separate, isolated sections of code to make sure I understood how I would accomplish the goals of each portion of the program. For instance, I was having trouble with one of my while statements so I opened a new script and worked through various iterations of the statement until the code worked. After doing this with other portions of the code I felt much more confident that I understood how to control the workflow of the bigger picture. I then combined what I learned from these smaller portions of code to write the final program.
     I should also mention that this is the first program where I included comments throughout the script. Commenting not only helped me organize my code but I felt that in explaining certain portions of the script it reinforced the concepts we focused on this week. Below you can see a screen shot of the program results.

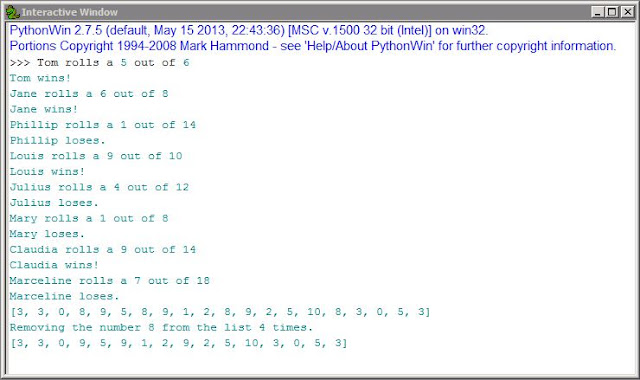
A screen shot of the script I wrote for this module.
It shows the results of a program that runs a dice game,
generates 20 random numbers between 0 and 10,
and  removes the number 8 from that list. 
     I struggled for a few hours but the pieces fell into place and I felt like something clicked because the solution seemed obvious after the fact. While it is not fun to feel frustrated, solving my issues this week felt like a win. I will also note that we have a class discussion board for this course and that is an incredible resource. I just want to give it some public credit because having a community to reach out to when I am confused is wonderful. I am also a part of a GIS listserv and again, what a great resource. It is nice to know that even though I sit and stare at a screen alone, there are others in my course doing the same thing and we are just a discussion board post away.

#Thanks Programming board!